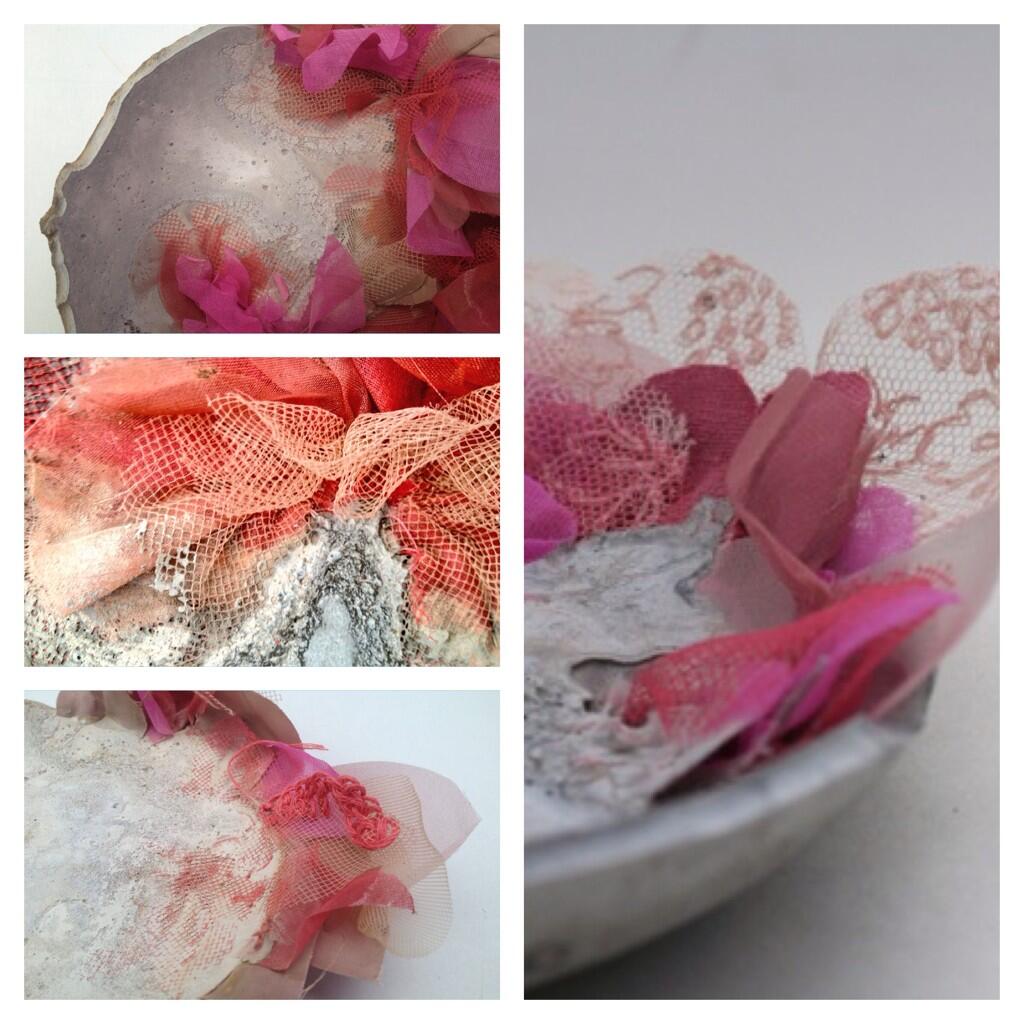
Collaboration with Bethany Walker: work in progress

I’ve long been fascinated by Bethany’s combination of textiles and cement; the contrasting soft and hard materials, the transformation of cloth from malleable to solid objects and the potential her innovative techniques would hold for my kind of manipulated textiles.

Last year I applied to a-n’s collaboration bursary to fund our travel and expenses to develop a collaboration and we started working together in January 2014.

Our aim is to create work suitable for public art commissions, large-scale installations and projects. I wanted to explore Bethany’s techniques and she wanted to look at more organic forms, moving away from her usual square-format.

We started by simply setting a whole series of my textile and paper samples into cement to see how they worked and then moved on to making specific samples to test based on what worked best and looked most interesting.


Plenty was simply scrapped as uninteresting, or not sufficiently exciting to stand out. I wanted to make sure what I made was sufficiently different to Bethany’s existing work too. A new set of samples worked much better and gave us new avenues to explore.


At this stage I was struggling to find a theme which worked for me, beyond simply exploring interesting shapes. Our discussions lead to the idea of growth and renewal and eventually to mould, lichen, moss and fungus. We also worked on colour palettes; looking for something that contrasted well with the grey of the cement but would also work with my quite subtle-coloured work. We used Pinterest to share ideas, much like I did with my collaboration with Alys Power. Our palette became delicate pink. Bethany continued to work on new shapes and forms while I experimented with fungus-inspired growths made in textile using fabrics I dyed with elderberry.

Their success was limited but other pieces definitely worked and we have finally hit upon the perfect combination of form, textile structure, colour-palette, type of fabric and display concept which we are really happy with.

mosaic

The finished work is a series of smaller pieces; potentially a lot of small pieces, so we are busy making more and more. Our aim is to exhibit the work in 2015 and use it as a basis for joint application for projects and commissions.


Natural Dye : Hypericum / St John’s Wort

One of the holy grail natural dyes seems to be St John’s Wort, capable of producing reds, pinks, yellows and greens from the same flowers. Investigating this, I deduce that this ideal plant is Hypericum Perforatum, which is a small plant, quite distinct from the hypericum shrubs that appear to be beloved of municipal planting schemes, at least in Leicester.  Before I worked this out, I picked 5 flowers of the ordinary kind from a park shrub and brewed them up in a tiny bit of water, following (ish) India Flint’s multiple extraction process to see if I could get different colours. The first was golden yellow but the second and third brews didn’t produce much. As it cooled, the dye started to turn pinky-orange and after an hour or so, was rich madder pink! Is this some kind of oxidisation? I’ve no idea.

I soaked a few pieces of unmordanted silk in the tiny dyebath and produced a lovely peachy pink, not dissimilar to avocado but with a more orangey tint. Gorgeous!

Hypericum

A couple of weeks ago I found another patch of the shrubs still in flower and picked a huge bag full.

OLYMPUS DIGITAL CAMERA

I tried the same dye extraction method but this time it took many, many repeated boilings. I got a lot of very pale yellow dye which didn’t turn pink-red so I kept going. Eventually the orangey-pink colour started to come out so I strained off into a different dye bath and after 20 or so repeated extractions, the orange kept coming but I gave up, exhausted with it!

The colour changed dramatically again; yellow is the first series of extractions, then the lighter orange was where I stopped. After a couple of hours it changed to the darker colour.  I’ve not dyed with this vat yet.

Hypericum dye samples

left; first extraction of dye, top; after it started turning orange, right; after cooling an hour or so

Yesterday I spent a wonderful day on Clarabella’s A Muted Palette natural dye workshop, experimenting with subtle colours, modified with iron, called saddening. I learned a huge amount and am now very keen to experiment more to create the kind of muted and mottled fabrics and threads that I love to use. I’ll add photos of them soon.

Natural Dye : Avocado

After about 15 years break, I’ve come back to experimenting with natural dyes.  I am not sure what took me so long. I suppose my old studio wasn’t set up for wet work, and for many years I lived with other people who would not appreciate messy dyestuff in their kitchens. For the last few years, since I’ve had my own house, I’ve wanted to set up a dye playground but I’ve simply not got round to it, although I’ve been collecting materials and information for at least 3 years.

I’ve got a stash of onion skins in the kitchen cupboard, I’ve had elderberries in the freezer since last autumn and I did have a stash of avocado skins and stones lying around too. I had got stuck on the idea that I needed a huge pan and had failed to find one at a car boot sale. Reason prevailed… I use pretty tiny bits of fabric in my work these days. There’s no real need for huge pans.

A couple of weeks ago, I was working on my new collection, Criminal Quilts 2, and wanted a soft pink silk organza to overlay on this piece.

I remembered the avocado skins. Finally everything fitted together. I simply repurposed a huge enamel roasting tin that I am never likely to use. I used 2 skins and stones that I had washed and dried a few months ago. I have some more in the freezer, before I worked out that they would dry fine. I don’t often buy imported fruit, but had bought a huge bowl of bruised avocados from Leicester market for a birthday guacamole, for a whole £1. Many of them went straight in the compost, but the stones were saved.

OLYMPUS DIGITAL CAMERA

I chopped the two stones & skins up and put them in the pan with tap water, simmered it for an hour or so, then strained off the bits. The dye water started off looking quite pink, then went more brown, and I really wasn’t sure it would work. In a very unscientific manner, I threw in various bits of fabric, unwashed (unless vintage) and unmordanted.  I simmered them for an hour or so again and then left them to soak overnight in the bath, although I fished out some of the silk almost immediately, after 5 minutes or so, as I wanted a very pale pink on the organza for the piece above.

I also took out some of the dye and put it in a separate bowl with a splash of white vinegar to see what that did. It mainly washed out the pink and created a pleasant but unexciting cream.

I rinsed the fabrics the following morning and dried them on the washing line.  As I was going on holiday for a week, I left the slightly exhausted dye pot with more fabrics in for the rest of the week, rather expecting it to grow mould. It didn’t, but instead produced some lovely, pale fabrics.

First batch:

avocado

The strongest colours are on silk / viscose velvet (centre) which is a rich pink. Wool felt (centre below velvet) also took the dye well and created a softer, creamier pink. The thread on top of this is a natural silk yarn that was quite beige to start with and didn’t change much.

Centre left is silk habotai which worked beautifully. Right of the velvet is the short-dip silk organza. Above that is silk chiffon which took a really strong salmon pink. The paler velvet at the front left came out of the vinegar dyepot and went into the main dyepot, so only had part of the soaking time. The lavender piece at the front is cotton lawn, as are some of the paler pieces in the back of the picture.

The week-long soaked exhausted bath produced some lovely pale versions of the original dyebath.

avocado2

The silk thread came out pinky-brown and the chiffon (beneath) is a lovely soft brown with a hint of pink. The colour barely took on the vintage cotton doilies though the lace in the foreground worked quite well. The scrap of silk selvedge at the front worked beautifully, as silk usually does.  Just visible in the foreground is some more vintage lace, which I used in the quilt shown above.

In all, I am delighted with the colours – they fit perfectly with my palette at the moment, and with the ease of the dye. I also tried wrapping the exhausted stones & skins in fabric and leaving them for a week, but the fabric dried out before anything happened. I’ll try it again next time, perhaps putting them into the exhausted dye bath too. Lots more experimenting to do and there will be more blog posts to come.