House and Garden Magazine

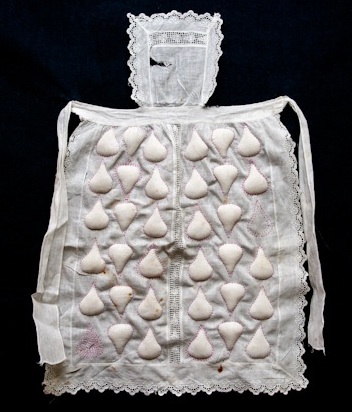
July’s edition of House and Garden magazine includes two of my art textile apron pieces in a design feature called Lace it Up.  I can’t show the page here because of copyright but it’s a lovely feature and shows the aprons looking bold and beautiful on a dark green wall.

SaveSave

Antique Textile Inspiration course

In June I will be running an exciting new 4-day course for West Dean College. In this course I will be sharing my own way of working taking inspiration from antique textiles and creating sketchbooks and samplers to develop into new textile pieces. Find out more about West Dean from my previous blog posts.

My original career plan was to work as a costume and textile curator in museums and I specialised for some years in medieval textiles. It didn’t quite work out like that and textile history became my hobby as my day job in museums was focussed on exhibitions and other projects covering a wide range of social and design history. I spent my days off researching medieval textiles in the V&A and other collections and developing a series of talks and workshops investigating textile and fashion history. When I started out making textile pieces in 2005 I chose to work with techniques drawn from my research, in particular 18th & 19th century dress trimmings.

These days my textile research is purely for inspiration as I work in a much broader way but is still key to forming my ideas and ways of working. I am excited to be able to share my textile collections and research through this course. I am also building up a lovely Pinterest board of ideas related to this course, so you can get a flavour of the colours, textures and patterns we will be enjoying throughout the week.


This intensive and exploratory workshop is designed for others with a love of antique textiles, those who love to explore museums and antique shops and want to make work inspired by what they find.  I aim to share the skills to research and explore old textiles, develop your understanding of design and technique as well as learn ways of translating what you love about old textiles into your own original contemporary work. Tuition will concentrate on sparking and developing your ideas, growing your confidence in working from inspiration material and selecting the best techniques to use to take your design ideas forward.

During the course you will have time to study my large personal collection of historic embroidered, embellished and quilted textiles and you are welcome to bring your own and explore the many textile treasures to be found in West Dean College buildings.  I will share my experience and knowledge of textile techniques and design and you will develop a sketchbook of shapes, colours, patterns, materials and textures drawn directly from the textile sources, then spend time exploring and experimenting with how to translate the feel of the historic pieces into your own contemporary work. I will demonstrate a wide variety of techniques which you can use for your own designs including hand and machine embroidery, fabric manipulation, painting and stencil printing, appliqué and other methods of embellishment to create exciting surface textures and pattern to develop ideas, designs and stitched samples.

For further information please see the course details on West Dean website.

You might also enjoy my textile history posts about smocking and trapunto quilting, two of my favourite obsessions.

Stitched textiles inspired by historic textile sources

12 to 16 June 2017
£426.00

Natural Dye : Hypericum / St John’s Wort

One of the holy grail natural dyes seems to be St John’s Wort, capable of producing reds, pinks, yellows and greens from the same flowers. Investigating this, I deduce that this ideal plant is Hypericum Perforatum, which is a small plant, quite distinct from the hypericum shrubs that appear to be beloved of municipal planting schemes, at least in Leicester.  Before I worked this out, I picked 5 flowers of the ordinary kind from a park shrub and brewed them up in a tiny bit of water, following (ish) India Flint’s multiple extraction process to see if I could get different colours. The first was golden yellow but the second and third brews didn’t produce much. As it cooled, the dye started to turn pinky-orange and after an hour or so, was rich madder pink! Is this some kind of oxidisation? I’ve no idea.

I soaked a few pieces of unmordanted silk in the tiny dyebath and produced a lovely peachy pink, not dissimilar to avocado but with a more orangey tint. Gorgeous!

Hypericum

A couple of weeks ago I found another patch of the shrubs still in flower and picked a huge bag full.

OLYMPUS DIGITAL CAMERA

I tried the same dye extraction method but this time it took many, many repeated boilings. I got a lot of very pale yellow dye which didn’t turn pink-red so I kept going. Eventually the orangey-pink colour started to come out so I strained off into a different dye bath and after 20 or so repeated extractions, the orange kept coming but I gave up, exhausted with it!

The colour changed dramatically again; yellow is the first series of extractions, then the lighter orange was where I stopped. After a couple of hours it changed to the darker colour.  I’ve not dyed with this vat yet.

Hypericum dye samples

left; first extraction of dye, top; after it started turning orange, right; after cooling an hour or so

Yesterday I spent a wonderful day on Clarabella’s A Muted Palette natural dye workshop, experimenting with subtle colours, modified with iron, called saddening. I learned a huge amount and am now very keen to experiment more to create the kind of muted and mottled fabrics and threads that I love to use. I’ll add photos of them soon.

Natural Dye :: Buddleia

I’m delighted by this one. Buddleia or Butterfly bush, grows pretty much all over the place here. Living in a city, there’s lots of wasteland around, particularly on my walk into town, where this stuff loves to grow. All over the canal tow path, around the parks and in scraps of land. I personally love it, but there are plenty that hate it. It may not be native, but how can you not love something that is covered in purple flowers for months of the year and is covered in butterflies, even in the heart of the city.

Some small bushes at the side of the ring road had been hacked down, taking down the still-flowering and dead heads. I picked up a few handfuls – about 10 heads, mostly dead ones. They went in the slow cooker overnight and created the most amazing honey-scent, just like the flowers were still in full bloom.  After 10-11 hours, the dye was golden yellow and I thought I might have overcooked it. After straining the dye, I put some unmordanted fabrics in – within 20 minutes the silk became a wonderful primrose yellow, so I took them straight out. Other fabrics were not so good – cottons (unsurprisingly) didn’t take too well, although the cotton lace did. Hemp silk looked stunning and golden after a day sitting in the warm dye. It had no effect on pale indigo on cotton though. Some of the fabrics dried with brown patches, which I almost like, but I will probably overdye them.

As the dye had plenty of life left in it, I put more fabrics in and left a bucketful to sit for 3 days. The colours were paler but still very pretty, although the silk organza came out after a couple of hours, as it had turned light olive, not the primrose yellow of the other silks, just to be confusing. I treated a snippet of it with vinegar to see what happened; it became slightly paler but not much.

I’ve now got some cotton mordanted so I can try again with the buddleia dye, either with what is left of the current vat, or some more another time.  Next to come in dye series: Hypericum & Marigold which I have tried and are lovely, plus goldenrod of which I have made the dye but not even tried a test sample. I’ve done a few leaf / petal bundles too, but I have a lot to learn about them. One had come out brilliantly, one is ok & one is strange indeed! There are 3 more sitting in plastic bags to be opened in a few more weeks.  I’ve also got walnut brewing and have got MASSES of random vegetation waiting for me to have time to play.  I was lucky at the car boot sale and bought a huge stainless steel bucket, so I can dye larger things, or at least mordant larger amounts of fabric. I’ve had a big sort out to organize all my white fabric, so expect more! I’m also going up to Yorkshire in a few weeks to learn from Clarabella, the expert, in her Muted Palette workshop, something I’ve wanted to do for ages and things finally fell into place. I can’t wait!

Natural Dye :: Comfrey

On holiday I picked masses of comfrey, growing abundantly on the canal bank in Staffordshire. I brewed it up in the enamel pan again and the initial colour looked very promising. I left a scrap of silk organza in the dye pot while it was brewing and it came out a bright, olive green – far right in picture.

mixed dyes

The other colours in this photo are: top left, tea on habotai, blue silk ribbon overdyed with comfrey, pinks are avocado, silk thread is comfrey, tatting on silk is avocado exhaust, purple / green mottled is red cabbage and the lower piece is comfrey

I then soaked the fabrics in the dye for about 12 hours, but they didn’t come out the same kind of vibrant green.  The silks mostly came out pale khaki or greeny-beige, and most of the cellulose fibres did nothing much at all – except, strangely, the overdyed Liberty lawn (pink flowers). This has never been washed so I assume there is a fabric treatment on it which has caused the reaction. Mid green-brown from a light cream fabric. Overall these are not the most exciting colours but they are exactly the kind of colours I like and use a lot, so I am very happy with them.

comfrey copy

Top left: silk habotai, filament silk thread, Liberty lawn with flowers, silk / viscose velvet beneath nicely splotchy, just how I like it, as is the linen on far right. Silk chiffon, the crinkly one at the bottom, silk ribbon and hemp silk bottom left. Silk thread, at the top, just peeking into the photo came out the same kind of greenish beige.

None of the fabrics was mordanted this time, so my next comfrey experiment will be.

Natural Dye : Avocado

After about 15 years break, I’ve come back to experimenting with natural dyes.  I am not sure what took me so long. I suppose my old studio wasn’t set up for wet work, and for many years I lived with other people who would not appreciate messy dyestuff in their kitchens. For the last few years, since I’ve had my own house, I’ve wanted to set up a dye playground but I’ve simply not got round to it, although I’ve been collecting materials and information for at least 3 years.

I’ve got a stash of onion skins in the kitchen cupboard, I’ve had elderberries in the freezer since last autumn and I did have a stash of avocado skins and stones lying around too. I had got stuck on the idea that I needed a huge pan and had failed to find one at a car boot sale. Reason prevailed… I use pretty tiny bits of fabric in my work these days. There’s no real need for huge pans.

A couple of weeks ago, I was working on my new collection, Criminal Quilts 2, and wanted a soft pink silk organza to overlay on this piece.

I remembered the avocado skins. Finally everything fitted together. I simply repurposed a huge enamel roasting tin that I am never likely to use. I used 2 skins and stones that I had washed and dried a few months ago. I have some more in the freezer, before I worked out that they would dry fine. I don’t often buy imported fruit, but had bought a huge bowl of bruised avocados from Leicester market for a birthday guacamole, for a whole £1. Many of them went straight in the compost, but the stones were saved.

OLYMPUS DIGITAL CAMERA

I chopped the two stones & skins up and put them in the pan with tap water, simmered it for an hour or so, then strained off the bits. The dye water started off looking quite pink, then went more brown, and I really wasn’t sure it would work. In a very unscientific manner, I threw in various bits of fabric, unwashed (unless vintage) and unmordanted.  I simmered them for an hour or so again and then left them to soak overnight in the bath, although I fished out some of the silk almost immediately, after 5 minutes or so, as I wanted a very pale pink on the organza for the piece above.

I also took out some of the dye and put it in a separate bowl with a splash of white vinegar to see what that did. It mainly washed out the pink and created a pleasant but unexciting cream.

I rinsed the fabrics the following morning and dried them on the washing line.  As I was going on holiday for a week, I left the slightly exhausted dye pot with more fabrics in for the rest of the week, rather expecting it to grow mould. It didn’t, but instead produced some lovely, pale fabrics.

First batch:

avocado

The strongest colours are on silk / viscose velvet (centre) which is a rich pink. Wool felt (centre below velvet) also took the dye well and created a softer, creamier pink. The thread on top of this is a natural silk yarn that was quite beige to start with and didn’t change much.

Centre left is silk habotai which worked beautifully. Right of the velvet is the short-dip silk organza. Above that is silk chiffon which took a really strong salmon pink. The paler velvet at the front left came out of the vinegar dyepot and went into the main dyepot, so only had part of the soaking time. The lavender piece at the front is cotton lawn, as are some of the paler pieces in the back of the picture.

The week-long soaked exhausted bath produced some lovely pale versions of the original dyebath.

avocado2

The silk thread came out pinky-brown and the chiffon (beneath) is a lovely soft brown with a hint of pink. The colour barely took on the vintage cotton doilies though the lace in the foreground worked quite well. The scrap of silk selvedge at the front worked beautifully, as silk usually does.  Just visible in the foreground is some more vintage lace, which I used in the quilt shown above.

In all, I am delighted with the colours – they fit perfectly with my palette at the moment, and with the ease of the dye. I also tried wrapping the exhausted stones & skins in fabric and leaving them for a week, but the fabric dried out before anything happened. I’ll try it again next time, perhaps putting them into the exhausted dye bath too. Lots more experimenting to do and there will be more blog posts to come.